The Mustang Forum for Track & Racing Enthusiasts

Taking your Mustang to an open track/HPDE event for the first time? Do you race competitively? This forum is for you! Log in to remove most ads.

  • Welcome to the Ford Mustang forum built for owners of the Mustang GT350, BOSS 302, GT500, and all other S550, S197, SN95, Fox Body and older Mustangs set up for open track days, road racing, and/or autocross. Join our forum, interact with others, share your build, and help us strengthen this community!

S197 3V Fabman's build; How did we get here? Build Thread

This site may earn a commission from merchant affiliate links, including eBay, Amazon, and others.

Fabman

Dances with Racecars
6,553
8,203
Exp. Type
W2W Racing
Exp. Level
20+ Years
Pleasanton: 1/2 way between Sonoma and Laguna Seca
539B36BB-3820-4702-9405-B44B16325D6E.jpeg
 

Fabman

Dances with Racecars
6,553
8,203
Exp. Type
W2W Racing
Exp. Level
20+ Years
Pleasanton: 1/2 way between Sonoma and Laguna Seca
Last edited:

Fabman

Dances with Racecars
6,553
8,203
Exp. Type
W2W Racing
Exp. Level
20+ Years
Pleasanton: 1/2 way between Sonoma and Laguna Seca
@Albino500 and I took 63.5 pounds off the nose so far....still working on it.
Stay tuned.

22BD33BC-874F-448C-A550-9C81E986F183.jpeg
 
Last edited:

Fabman

Dances with Racecars
6,553
8,203
Exp. Type
W2W Racing
Exp. Level
20+ Years
Pleasanton: 1/2 way between Sonoma and Laguna Seca
Wow!! thats going to make a bif difference!!.
The ABS doesn't work so might as well just delete it.
Between all the ABS stuff, extra computer, junction box, wires, my aluminum splitter and mounts it was 63.5#. An @AJ Hartman carbon fiber splitter will go back on with some specfab racing light weight mounts so lets see how much of that I gain back.
 
Last edited:

Fabman

Dances with Racecars
6,553
8,203
Exp. Type
W2W Racing
Exp. Level
20+ Years
Pleasanton: 1/2 way between Sonoma and Laguna Seca
Oh boy, I love my ABS.... But if its not working, what the heck.
It hasn't worked all year so what the hay.... I'll install a driver adjustable proportioning valve so at least I'll have some control of the brake bias.
 
Last edited:

Fabman

Dances with Racecars
6,553
8,203
Exp. Type
W2W Racing
Exp. Level
20+ Years
Pleasanton: 1/2 way between Sonoma and Laguna Seca
Are installing ARP main studs ??? Or stock torque to yield??
Stock everything. Just some fresh parts this time around.
 

Fabman

Dances with Racecars
6,553
8,203
Exp. Type
W2W Racing
Exp. Level
20+ Years
Pleasanton: 1/2 way between Sonoma and Laguna Seca
More of the 63.5 pounds we took off the nose.
I was surprised how fast it added up.
More to come.


52EC8DA5-6F77-4438-9AE6-96571F8A2864.jpeg416DE0D3-938A-4371-BDC7-0E65D3EEA6B0.jpeg824FE0D5-4C26-4F47-974A-2403565B3F32.jpeg5821A694-F4FE-475A-8C68-6FFF0EF822E8.jpegD0F7AA91-DBCB-4CE6-8AE6-FC89151161A9.jpeg
 
Last edited:

Fabman

Dances with Racecars
6,553
8,203
Exp. Type
W2W Racing
Exp. Level
20+ Years
Pleasanton: 1/2 way between Sonoma and Laguna Seca
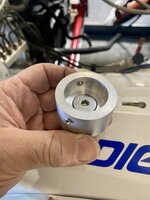
Needed a good way to adjust the brake bias without having to plumb the valve inside the car or having to stop and open the hood to make adjustments.
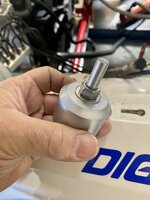
Since the factory knob is not removable we had to machine up a little adapter for a cable.


IMG_3855.jpg


The adapter is threaded to accept that flat head bolt and lock tighted in so once the jam nut is tightened there is no way for it to come loose and spin. Two 10-32 set screws keep the unit secured to the valve.


IMG_3856.jpg


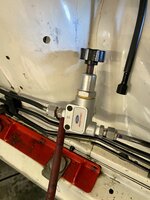
The valve had 1/8" pipe thread and a double flare adapters and the car has metric bubble flares.
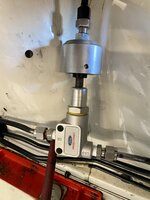
Comming up with a magic combination of adapter fittings seemed impossible so once I removed the vinyl coating on the factory brake lines I was able to use 1/4" stainless steel swagelock compression fittings and eliminated any adapter nonsense.


IMG_3857.jpg


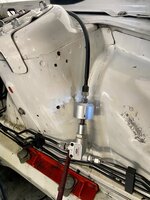
Its a little clunky looking but works perfectly and will be hidden under the airbox.


IMG_3858.jpgIMG_3859.jpg

Now to make a mount for the bias knob in side the car....stay tuned.
 

Fabman

Dances with Racecars
6,553
8,203
Exp. Type
W2W Racing
Exp. Level
20+ Years
Pleasanton: 1/2 way between Sonoma and Laguna Seca
A new splitter setup necessitated moving some things around to clear the new larger tunnels.
So, I re-fabbed the hard plumbing for my 4” brake ducts and added an offset to the remote oil filter bracket.

1.jpg2.jpg3.jpg4.jpg
 
Last edited:

Fabman

Dances with Racecars
6,553
8,203
Exp. Type
W2W Racing
Exp. Level
20+ Years
Pleasanton: 1/2 way between Sonoma and Laguna Seca

Dave_W

Cones - not just for ice cream
1,002
1,307
Exp. Type
Autocross
Exp. Level
20+ Years
Connecticut
Two 10-32 set screws keep the unit secured to the valve.
@Fabman, as usual, very nice work. I've got a couple ideas if you need to make a second version. It seems like the 2 set screws hold the adapter to the knob by friction, and hold under both rotational (adjusting the bias) and linear (adapter pulling off the knob) loads. Based on their length, they are interfacing with the "fingers" of the knob rather than the indents.

If you made the adapter longer/deeper, you could have 1 or 2 longer set screws that would go "under" the knob fingers to create a mechanical interference to keep the adapter from pulling / vibrating off the knob. Or you could get really fancy and machine a groove inside the adapter to use a circlip (you'd have to get the circlip around the adjuster shaft).

With the linear load taken off the current set screws, you only need them to transfer rotational load, and could make them larger (both diameter and length) so they fit into the indents of the knob and "push" against the knob fingers, again using mechanical interference instead of friction.

I'm sure based on your knowledge and experience in design & fabrication, and some Loctite, the current adapter will be fine. I'm always thinking of the "belt and suspenders" approach, especially in context of the types of vibration/shock loads from curb-jumping and two-wheels-off events for a track car.
 

Fabman

Dances with Racecars
6,553
8,203
Exp. Type
W2W Racing
Exp. Level
20+ Years
Pleasanton: 1/2 way between Sonoma and Laguna Seca
@Fabman, as usual, very nice work. I've got a couple ideas if you need to make a second version. It seems like the 2 set screws hold the adapter to the knob by friction, and hold under both rotational (adjusting the bias) and linear (adapter pulling off the knob) loads. Based on their length, they are interfacing with the "fingers" of the knob rather than the indents.

If you made the adapter longer/deeper, you could have 1 or 2 longer set screws that would go "under" the knob fingers to create a mechanical interference to keep the adapter from pulling / vibrating off the knob. Or you could get really fancy and machine a groove inside the adapter to use a circlip (you'd have to get the circlip around the adjuster shaft).

With the linear load taken off the current set screws, you only need them to transfer rotational load, and could make them larger (both diameter and length) so they fit into the indents of the knob and "push" against the knob fingers, again using mechanical interference instead of friction.

I'm sure based on your knowledge and experience in design & fabrication, and some Loctite, the current adapter will be fine. I'm always thinking of the "belt and suspenders" approach, especially in context of the types of vibration/shock loads from curb-jumping and two-wheels-off events for a track car.
Good perspective. Here is my thought process on this.
The set screws are in the "Indents" of the knob and will be secured with locktight.
A blob of silicone will be deposited between the knob and adapter at final assembly to make this a perfect union. (I was going to use Devcon but why bother when silicone will do).
The cable is held in place with rubber cushioned Adel clamps and will resist any upward pressure to dislodge the adapter, and even if there was the silicone would keep this unitized with or without the set screws.
My engineering ethos has always been; "Make everything as simple as possible, but no simpler."
I'm more concerned with heat transfer from the headers so I'm digging through my heat shielding remnants today....sounds like I'm going to have a motor in a few weeks and I gotta get things going.
 

TMO Supporting Vendors

Latest posts

Buy TMO Apparel

Buy TMO Apparel
Top