The Mustang Forum for Track & Racing Enthusiasts

Taking your Mustang to an open track/HPDE event for the first time? Do you race competitively? This forum is for you! Log in to remove most ads.

  • Welcome to the Ford Mustang forum built for owners of the Mustang GT350, BOSS 302, GT500, and all other S550, S197, SN95, Fox Body and older Mustangs set up for open track days, road racing, and/or autocross. Join our forum, interact with others, share your build, and help us strengthen this community!

Install The E-Z Do-It-Yourself Snap On Engine Breather Kit

This site may earn a commission from merchant affiliate links, including eBay, Amazon, and others.

Here is a quick vid (s) on the installation of the canister kit. Raw video so no poking fun at me ;D Sorry it is in four parts, when I tried to combine these the audio was silent, watch in order. It was also a little difficult to do while holding the camera. Anyway I don't think it came out too bad except the four parts not being one. For those getting the first set of the canisters. I did not go into the clamps near the snap fitting in depth in the video. You will need to twist these around and tighten down the clamp once it is in a position you are happy with.

The canister is a Peterson brand and compliant with many different racing sanctioning bodies. Hose is Pro-lite 350 or similar quality, fittings are Earls or similar quality, hose connectors and hose elbows are OEM Ford parts.

When finished start the car and let idle for five minutes before driving to reset the idle, no tune is needed.

Cost for the canister is $335-400 depending on how many are built at once and cost of parts which can vary. The price always includes shipping charges in the US. Canada will be $10-20 more, actual shipping charges only. There is a 3% paypal fee added if using that, I would rather a check or MO.

One change that will be made is the canister kit will come without the hoses attached, see picture one below. These hoses attach very easy, just screw on and snug in place. They do not need to be tightened hard. You can use a one inch wrench, adjustable wrench or pliers, use a cloth over the hose fitting if using pliers to avoid scratching the black finish. If you want the canister with the hoses attached, test fitted to my car and the clamps (where the hoses snap into place on the valve covers) positioned and tightened in place, it will be an extra $40 charge.

If there are any questions please let me know.

http://www.youtube.com/watch?v=A2FDyRWmeLI
http://www.youtube.com/watch?v=iW0KZnY5zcI
http://www.youtube.com/watch?v=ee7GbzHu1-s
http://www.youtube.com/watch?v=a39AiKaok5A

canistersetup_zps4ce8c913.png
canistersetup1_zps0340df14.png


OLD info .....
I will update this thread with a complete how-to on the kit that is being put together. Several people asked for detailed instructions, for now I did a quick fit on the bracket to make sure the bracket was correct. cp85gt did a wonderful job making the bracket and the shop was able to follow his instructions for a perfect fit. We all owe him a big thanks. The shop made the bracket out of aircraft grade aluminum. I am no metallurgist and just shook my head like I knew the difference, in the end they felt it was better then doing stainless like we first talked about.

Until I get the full instruction up this should show how easy the install will be, even Gary will be able to do it ::)

Here is how the bracket will come, one bolt will hold it in place that you will need to attach.
canistersbracket1_zpsf18b5a63.png

This is how the canister and lines will come
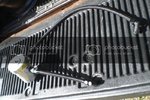
canistersbracket2_zps9ad07501.jpg

Where the bracket fits. I have my strap mounted very low, I did this due to the shape of the firewall. This way is actually better since the strap will be in the middle of the can and the nut that needs to be loosened will be more accessible.
canistersbracket3_zps60ff5119.png
canistersbracket4_zpsc5aa202b.jpg
 
All breathers I have now are sold. I am not sure when or if there will be more. I do have a few extra brackets for the do-it-yourself people. PM me if interested.
 
Hey YellowBoss,

This is John - decided to register on forum. Thanks for the info regarding your breather kit. While I don't have a Boss, I do have a 14 GT with an upcoming Paxton build. This will work out perfectly as the JLT catch can has not really worked well with the supercharger.
 
152
0
cloud9 said:
Good idea. Scott has his battery in the trunk so you don't see it on his car. It still seems pretty close but maybe no big deal?
I was installing mine and didn't move the positive battery cable around. Well, I threw a few small sparks...no big deal I thought...it wasn't like I was running a mig welder under there. Loosened up the positive terminal and rotated it around to get it as far away from the can as possible. Hooked everything up and started the car. Started fine, but noticed that the "Service AdvanceTrac" memo was on. Turned the car off and on a few times...still on. Checked to see it there was and AdvanceTrac or ABS fuse that may have blown...all was good. Went to start the car up again and let it idle for a while...no start and now "Service Battery" memo showing. I had power but nothing to the starter. Looked around and found that the 2 wires going to the positive battery terminal meet at a junction box that is fused for 100 amp on 1 side and 200amp on the other before they merge to attach at the positive battery terminal. My 100 amp side fuse is blown. Hopefully my ford dealer will have the $25 fused junction here by tomorrow afternoon like they said so I can get the car running again (hoppefully the AdvanceTrac is ok) so I can get to Autobahn on Monday! Stupid mistake I guess!
 
Sorry about the troubles, it is always a good idea to disconnect the battry when working close to it or other wiring jobs.

John, glad you joined, welcome.

I will make up your kit as soon as I get parts. If anyone wants one let me know, price is $450 since I can not get the cans at the cheap price now. I ordered hose to make John's and two more.
 
401
0
Hey YellowBoss, I never bought one of your canisters but had a question. The JLT and other separators seem to filter the oil while letting the air flow. But the 302S set up doesn't do that and instead just takes the oil from both heads and collects it to. Where does the air go? Or have you just eliminated the re-burn all together? Side effects? Thanks. I wish I could buy one of your systems, but I just cant afford that kinda cash right now. I am going to try to follow your lead and make my own but was wondering how it works since their is no return back to the engine.
 
The PVC system uses vacuum from the intake to "flush" the top end of volatile and corrosive gases. It sucks that back into engine to be re-burnt, it doing that it cleans the air in the top end, reduces the pressure build up and does it in a way that causes less pollution.

The canister setup allows the system to vent naturally reducing the pressure build up you would get if say they were just capped off. It does allow the fumes to be vented into the air rather then be re-burnt and if all cars on the road did not have a PVC it would create a lot of pollution. However for track and racing purposes this setup works well as you do not want pressure up top as it robs HP, just like burning off this "dirty" mixture will rob HP.

The canister is not there to collect oil, it is just a breather. The canister is part of the setup just in case any oil makes it all the way to the can rather then spilling all over the engine compartment. When setup and installed correctly the lines run downhill from the can to valve cover area return any oil that may build up in the hoses from the fumes.

This is why I made the kits as I did, you can install the canister for track days and return your factory parts later saving the planet. Now if someone could just shut off all the volcanoes ::) All of this is just my limited understanding of the system and is not to be taken for fact. For more info read here:

http://en.wikipedia.org/wiki/Crankcase_ventilation_system

really, not joking it is a good read and helps understanding how it works and the history behind it. That is if the info there is also correct.
 
YellowBoss said:
Did you install a breather setup like the one listed in post one?

No I didn't, I just have a moroso catch can on the passenger side, with the PCV valve.
On the driver side I installed a breather.

With my setup I wasn't sure if I was supposed to remove the PCV valve like you did on your kit?
 
YellowBoss said:
Did you install a breather setup like the one listed in post one?

I have a moroso catch can on the passenger side with original PCV.
On the driver side I installed a breather.

Wasn't sure if I should remove the PCV like you did on your system?
 
JTRATX said:
No I didn't, I just have a moroso catch can on the passenger side, with the PCV valve.
On the driver side I installed a breather.

With my setup I wasn't sure if I was supposed to remove the PCV valve like you did on your kit?

With any of the aftermarket oil separators you do not remove the PCV valve. Also there is never a need to install any kind of drivers side oil separator since this side draws clean air in from the intake tube.
 
401
0
That was another question I had. I heard after-market PCV valves are hard to find, so seeing you replace the passenger side PCV was surprising. Was it just so you could fit your own fittings?
 
sadil said:
That was another question I had. I heard after-market PCV valves are hard to find, so seeing you replace the passenger side PCV was surprising. Was it just so you could fit your own fittings?

I'm sorry but I don't understand the question or who it for?

On the subject of the PCV valve itself, it is:

Left in place with the oil separators as they work with the PCV system intacted and are only added to try and catch some of the oil being passed in the factory line to the intake.

It is removed with a breather type setup since the idea behind this system is to breath or vent gases normally and without any type of added pressure or vacuum. Having a valve in there with a breather is the same as having a clogged line.
 

ArizonaBOSS

Because racecar.
Moderator
8,730
2,734
Arizona, USA
sadil said:
That was another question I had. I heard after-market PCV valves are hard to find, so seeing you replace the passenger side PCV was surprising. Was it just so you could fit your own fittings?

If you're talking about Scott's breather kit, he replaced the passenger side PCV valve with an open fitting (the same PN for the one that is on the driver's side of the engine). He's using Ford OEM fittings.
 
152
0
Maybe this is a dumb question, but how often and how do you drain the collected oil from the canister? I have 1 track day and a few hundred street miles on mine.
 
jlwdvm said:
Maybe this is a dumb question, but how often and how do you drain the collected oil from the canister? I have 1 track day and a few hundred street miles on mine.

Then you should have exactly three drops inside. ;)

But just in case you have more:

1. Install a drain petcock on the bottom. Not sure of the size, but here is a variety, each for just a coupla bucks:
http://www.summitracing.com/search/part-type/petcocks?kr=petcock&SortBy=None&SortOrder=Ascending

2. Turkey baster.

3. Take the whole thing off and pour it out.
 

TMO Supporting Vendors

Latest posts

Buy TMO Apparel

Buy TMO Apparel
Top