- Welcome to the Ford Mustang forum built for owners of the Mustang GT350, BOSS 302, GT500, and all other S550, S197, SN95, Fox Body and older Mustangs set up for open track days, road racing, and/or autocross. Join our forum, interact with others, share your build, and help us strengthen this community!
You are using an out of date browser. It may not display this or other websites correctly.
You should upgrade or use an alternative browser.
You should upgrade or use an alternative browser.
S550 A Pale Horse Build Thread Profile - S550 Mustangs
- Thread starter5.2 liters of democracy
- Start date
This site may earn a commission from merchant affiliate links, including eBay, Amazon, and others.
More options
Who Replied?- Thread starter
- #222
Yessir. I have the mounting plates spaced exactly at 24 inches, but realistically they could be placed anywhere along the arch with a little modification on my end in CAD. Overall height is 16 inches and would sit under the trunk lid. My thought is this can be done as a DIY kit to keep costs low. Each of these pieces could be cut by a company like SendCutSend and welding together by yourself or a local shop.Wow that looks great man! I assume the distance between the plates with the holes will match the wing mount spacing?
This is not my area of expertise so I dont have much feedback. How tall it going to be? Is it going to sit right under the lid?
@5.2 liters of democracy any updates 
- Thread starter
- #224
I'll try to write something up tonight.@5.2 liters of democracy any updates
- Thread starter
- #225
Alright, this may be a littler scattered since there are a good number of updates. Between SEMA, a personal vacation, and then being sick for a week I basically lost three weeks of any progress. I'm working on catching up now and I believe I should have the last parts to bolt up the car by next week.
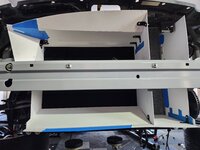
First off, I've just about finish the ducting, I just need to test how the brake ducts fit. I took a lot of time with this one because I want it to be repeatable for anyone with the file. I'll be sending the pieces out for laser cutting next week most likely and should have something by late dec/early Jan. It's hard to see, but I've also 3D printer a bracket that mounts to the stock radiator support beams. I'll be taking measurements to re-use those as well. I don't see why they couldn't be added back in with some small oval holes on the side of the ducting.
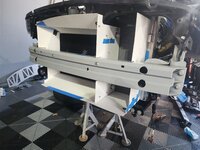
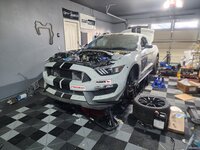
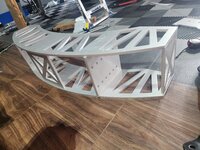
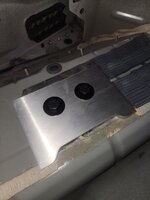
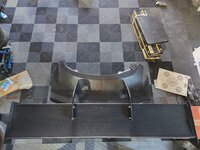
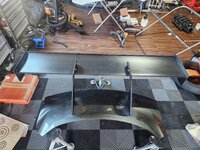
Next up is the wing mount. I've received all the pieces and need them welded up. It seems none of the local shops want any business because nobody responds to my requests to simply tack them up for me for test fitting. I've made some small revisions not shown in the pictures to cut more weight out of the center wing mounts. It bolts through two layers of metal in the trunk which I will also be reinforcing just in case. Likely a sleeve that will fit around the M14 hardware. That'll just be a quick fix once I have everything bolted in place. The second picture is the baseplate to show how much area there will be the spread the downforce. It should be perfect for my application.
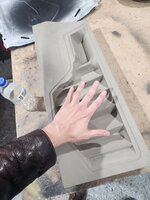
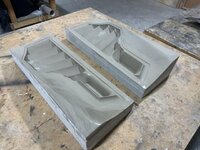
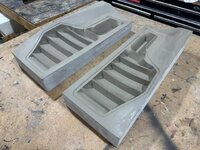
Next up is the vent project I have going on with Phoenix. The molds are done, but I'm having them make a backup and begin pulling the first for test fit. My glove size is a 2XL so you can tell these are quite large. What makes these different from most of the other options is they aren't simply copying the GT3RS design and hoping for the best. I purposely had the car fully 3D scanned to give Kyle at JKF the full picture on how the air would glow. No simulated flat floor, no guesswork behind the bumper. It's all based fully on the GT350 parts inside and out. I'm very proud of these. I've gone through every step I can to make sure they perform and aren't show pieces. I even told Kyle I don't care what they look like, I want them to work.
Speaking of aero, I've mocked up the wing after cutting the trunk. It's a big wing. It's cool. I love it.
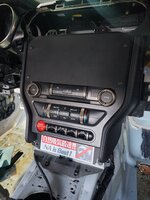
I also whipped up some block off plates for the infotainment and slapped a sticker I liked on it. A lot of people probably won't like it, but that's fine. I have thick skin and a thicker skull.
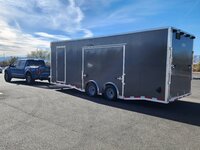
Finally, I had enough of having a rental U-haul trailer 25-30 days of the year and most certainly was tired of loading the car in backwards, climbing over the center console, fitting my ape-sized torso under the car to remove the safety chain, and dealing with the crappy ramps that were nearly as loud as my car every time they were moved. I snagged an all-aluminum enclosed trailer that will make going to the track much simpler. It was far cheaper than it had any right to be. I can pull in, blow up an air mattress, and hang out with all the awesome TMO folk instead of spending an hour unpacking a tent and cots only to have to disassemble them 40 hours later.
Updates should start coming pretty fast. The last unknown is the oil block but I can whip up the lines so once that's done it's just unbolting and bolting it on.
First off, I've just about finish the ducting, I just need to test how the brake ducts fit. I took a lot of time with this one because I want it to be repeatable for anyone with the file. I'll be sending the pieces out for laser cutting next week most likely and should have something by late dec/early Jan. It's hard to see, but I've also 3D printer a bracket that mounts to the stock radiator support beams. I'll be taking measurements to re-use those as well. I don't see why they couldn't be added back in with some small oval holes on the side of the ducting.


Next up is the wing mount. I've received all the pieces and need them welded up. It seems none of the local shops want any business because nobody responds to my requests to simply tack them up for me for test fitting. I've made some small revisions not shown in the pictures to cut more weight out of the center wing mounts. It bolts through two layers of metal in the trunk which I will also be reinforcing just in case. Likely a sleeve that will fit around the M14 hardware. That'll just be a quick fix once I have everything bolted in place. The second picture is the baseplate to show how much area there will be the spread the downforce. It should be perfect for my application.


Next up is the vent project I have going on with Phoenix. The molds are done, but I'm having them make a backup and begin pulling the first for test fit. My glove size is a 2XL so you can tell these are quite large. What makes these different from most of the other options is they aren't simply copying the GT3RS design and hoping for the best. I purposely had the car fully 3D scanned to give Kyle at JKF the full picture on how the air would glow. No simulated flat floor, no guesswork behind the bumper. It's all based fully on the GT350 parts inside and out. I'm very proud of these. I've gone through every step I can to make sure they perform and aren't show pieces. I even told Kyle I don't care what they look like, I want them to work.


Speaking of aero, I've mocked up the wing after cutting the trunk. It's a big wing. It's cool. I love it.


I also whipped up some block off plates for the infotainment and slapped a sticker I liked on it. A lot of people probably won't like it, but that's fine. I have thick skin and a thicker skull.

Finally, I had enough of having a rental U-haul trailer 25-30 days of the year and most certainly was tired of loading the car in backwards, climbing over the center console, fitting my ape-sized torso under the car to remove the safety chain, and dealing with the crappy ramps that were nearly as loud as my car every time they were moved. I snagged an all-aluminum enclosed trailer that will make going to the track much simpler. It was far cheaper than it had any right to be. I can pull in, blow up an air mattress, and hang out with all the awesome TMO folk instead of spending an hour unpacking a tent and cots only to have to disassemble them 40 hours later.

Updates should start coming pretty fast. The last unknown is the oil block but I can whip up the lines so once that's done it's just unbolting and bolting it on.
- Thread starter
- #227
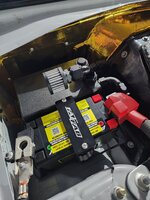
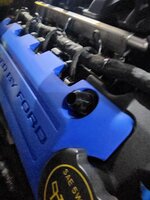
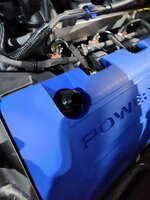
More goodies have gone in or are on the way. I picked up Fathouse's lightweight battery/catch can tray combo to sit where the stock battery used to. The whole thing only weighs 8lbs which is nice. I'm running the Antigravity ATX20-HD. I just need to whip up the lines to run to the new valve cover AN fittings. I didn't realize how bad my pics of the head covers were until now, but I'm at work and can't take new ones 
I also purchased my seat finally. These never go on sale, but I did manage to save $150 on it. It's the last large expense before my first romp with this car in Feb at Chuckwalla. The seat will also be bolted to the roll bar with Racetech's adjustable mounting kit. Venting from a naca duct to the back of the seat will come later. I'm just focused on what gets the car running now.



I also purchased my seat finally. These never go on sale, but I did manage to save $150 on it. It's the last large expense before my first romp with this car in Feb at Chuckwalla. The seat will also be bolted to the roll bar with Racetech's adjustable mounting kit. Venting from a naca duct to the back of the seat will come later. I'm just focused on what gets the car running now.

- Thread starter
- #229
I have one more update you'll like as well. I have someone to weld up the wing mount so I can then make the intermediate uprights. One step closer!Love the progress man. Definite wish more manufacturers made seats with integrated back brace mounts
The full story that led to this is a doozy, but's it is probably good to air out for anyone else that wants to try a similar thing on their build in the future. I know I've been through several members' build threads here 10+ times and I've picked many things up from those many years before I actually needed them. Here we go:
Lessons Learned from Third-Party Machining
I lost my engine to oiling. While rebuilding it, I found that Ford Performance is the only company that makes a remote oil block with AN12 fittings. AN12 matches the ports on the block as well. EVERY. SINGLE. COMPANY. that isn't Ford makes these in AN10. Why? My guess is it's easier to downsize and rely on their brand history to sell them than have to make an oil block with offset AN12 fittings. Two AN12 fittings do not fit next to each other without having to have one come in at a diagonal.
So why not use the Ford one? Believe it or not, it doesn't fit properly. I have pictures earlier in this thread that demonstrate how far off the three mounting holes are on the remote oil block Ford makes. Even if I was to port the holes on the block, the holes being larger and offset relative to the AN port may cause some turbulent flow. Do I know without a shadow of a doubt that AN10 isn't perfectly fine? Not entirely, no. Am I willing to risk it? Absolutely not. Ford put way more money into engineering their parts than likely all these companies combined. I lost one engine to lack of oiling, I'm not losing another.
So how did I handle it? Well I taught myself how to use Fusion 360 for months and eventually made my own. I went through about 20 3D printed prototypes before I landed on something that 1) wouldn't have any weird angles affecting flow, 2) used exclusively AN12 as Ford intended, and 3) cleared all the necessary components down there (mainly the alternator) while re-using the OEM oil pressure sensor (1/4 NPT). Everything pointed to it being perfect until I needed to have it made.
After many quotes, I used Parts Badger to CNC the part as they were able to provide me quick support and assurance on the thread pitch. I even double checked via e-mail that they understood the thread pitch needed to fit an AN12 fitting. Well whatever they did does not fit any AN12 fitting I nor three local machine shops own. After I was sent to the third machine shop, they let me know that welding the fitting in place probably makes the most sense because the fitting still does not enter properly even after they ran a tap through it. It binds after about 3/4 of a turn. We've tried four different AN fittings and whatever machining was done to this thing has made no sense to three local shops.
I ending up asking the shop if there was a local guy they trust for the welding work and fortunately they did know someone that was directly across from them in the industrial center I was at. That's something I've learned is these industrial centers are often much more than single businesses working near each other. These places end up being a whole network of guys that hop in and out of each others' shops to solve issues. They can almost always guide you with services that are adjacent to their own, but that they don't really do. It looks like all the work is finally coming to an end now that I have a local welder and a solution to this stupid issue I've been having.
Insert stupid quote about things that are hard being worth doing or some other BS. I originally went down this path to save money because the aftermarket parts were cheaper than the OEM housing
TL;DR
Be careful with online, third-party machining. Try a local place first. I have a local race car and sand rail frame builder welding the fittings onto the oil block and welding up the wing mount.
The gold acquestrian
- Thread starter
- #231
Does anyone happen to have a favorite method for draining the gas tank? I need to get all the old 91 out of there in favor of E85. Thanks!
Edit: Ideally one that doesn't require the car to be started since it isn't tuned right now. I may just have to have the tuner pump it out.
Edit: Ideally one that doesn't require the car to be started since it isn't tuned right now. I may just have to have the tuner pump it out.
Last edited:
I have one of these VMP fuel swapping kits - it turns the pump on without the engine started. Never been used, you’re more than welcome to give it a rip.Does anyone happen to have a favorite method for draining the gas tank? I need to get all the old 91 out of there in favor of E85. Thanks!
Edit: Ideally one that doesn't require the car to be started since it isn't tuned right now. I may just have to have the tuner pump it out.
https://www.vmpperformance.com/VMP-Fuel-Swapping-Kit
- Thread starter
- #233
Thanks brother! I just heard from the tuner and it turns out he can just pump it right out for me.I have one of these VMP fuel swapping kits - it turns the pump on without the engine started. Never been used, you’re more than welcome to give it a rip.
https://www.vmpperformance.com/VMP-Fuel-Swapping-Kit
That’s exactly why mine never got used - Sean had a similar setup. Now that I think about it, it’s best to start a new engine on gas and then cut over after initial ring seat and baseline tuning.Thanks brother! I just heard from the tuner and it turns out he can just pump it right out for me.
Sean put that tune in my car. I pump out the E85 and put 93 in tank and engine during storageThat’s exactly why mine never got used - Sean had a similar setup. Now that I think about it, it’s best to start a new engine on gas and then cut over after initial ring seat and baseline tuning.
- Thread starter
- #236
That's great info. This is my first adventure into the land of new engines so I passed that info along to the tuner. We'll have to pump out the old 91 since it has been in the tank for about 14 months now.That’s exactly why mine never got used - Sean had a similar setup. Now that I think about it, it’s best to start a new engine on gas and then cut over after initial ring seat and baseline tuning.
Pics of said adapter? Did you try just using an ORB hose end ? Or possibly a banjo style, those are commonly use on dry sump setups. Just curious what wasn't workingI have one more update you'll like as well. I have someone to weld up the wing mount so I can then make the intermediate uprights. One step closer!
The full story that led to this is a doozy, but's it is probably good to air out for anyone else that wants to try a similar thing on their build in the future. I know I've been through several members' build threads here 10+ times and I've picked many things up from those many years before I actually needed them. Here we go:
Lessons Learned from Third-Party Machining
I lost my engine to oiling. While rebuilding it, I found that Ford Performance is the only company that makes a remote oil block with AN12 fittings. AN12 matches the ports on the block as well. EVERY. SINGLE. COMPANY. that isn't Ford makes these in AN10. Why? My guess is it's easier to downsize and rely on their brand history to sell them than have to make an oil block with offset AN12 fittings. Two AN12 fittings do not fit next to each other without having to have one come in at a diagonal.
So why not use the Ford one? Believe it or not, it doesn't fit properly. I have pictures earlier in this thread that demonstrate how far off the three mounting holes are on the remote oil block Ford makes. Even if I was to port the holes on the block, the holes being larger and offset relative to the AN port may cause some turbulent flow. Do I know without a shadow of a doubt that AN10 isn't perfectly fine? Not entirely, no. Am I willing to risk it? Absolutely not. Ford put way more money into engineering their parts than likely all these companies combined. I lost one engine to lack of oiling, I'm not losing another.
So how did I handle it? Well I taught myself how to use Fusion 360 for months and eventually made my own. I went through about 20 3D printed prototypes before I landed on something that 1) wouldn't have any weird angles affecting flow, 2) used exclusively AN12 as Ford intended, and 3) cleared all the necessary components down there (mainly the alternator) while re-using the OEM oil pressure sensor (1/4 NPT). Everything pointed to it being perfect until I needed to have it made.
After many quotes, I used Parts Badger to CNC the part as they were able to provide me quick support and assurance on the thread pitch. I even double checked via e-mail that they understood the thread pitch needed to fit an AN12 fitting. Well whatever they did does not fit any AN12 fitting I nor three local machine shops own. After I was sent to the third machine shop, they let me know that welding the fitting in place probably makes the most sense because the fitting still does not enter properly even after they ran a tap through it. It binds after about 3/4 of a turn. We've tried four different AN fittings and whatever machining was done to this thing has made no sense to three local shops.
I ending up asking the shop if there was a local guy they trust for the welding work and fortunately they did know someone that was directly across from them in the industrial center I was at. That's something I've learned is these industrial centers are often much more than single businesses working near each other. These places end up being a whole network of guys that hop in and out of each others' shops to solve issues. They can almost always guide you with services that are adjacent to their own, but that they don't really do. It looks like all the work is finally coming to an end now that I have a local welder and a solution to this stupid issue I've been having.
Insert stupid quote about things that are hard being worth doing or some other BS. I originally went down this path to save money because the aftermarket parts were cheaper than the OEM housing
TL;DR
Be careful with online, third-party machining. Try a local place first. I have a local race car and sand rail frame builder welding the fittings onto the oil block and welding up the wing mount.
I could have machined that for you btw.. LOL
Last edited:
- Thread starter
- #238
None of the 1-1/16-12 fittings would fit the part, even after having a tap run through it. It completely perplexed three machine shops. We tried four different AN12 fittings and even verified their size by running them through other pieces tapped to that size. The part is hard anodized so perhaps that's what was causing the interference? None of us wanted to try and force a fitting down in the part and completely ruin it so I just settled on welding it. Here's the fitting:Pics of said adapter? Did you try just using an ORB hose end ? Or possibly a banjo style, those are commonly use on dry sump setups. Just curious what wasn't working
I could have machined that for you btw.. LOL

AN-12 to AN-12 Male Flare Union Fitting
P/N 15611: AN-12 to AN-12 Male Flare Union Fitting More area and smoother transitions from the inlet to the outlet, resulting in less restriction than any other fitting line.The Aeromotive line of custom fittings, adapters and hose-ends are a step above the norm, offering uncompromised fuel flow...
Here's the part:
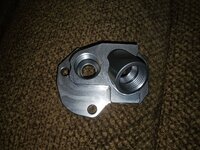
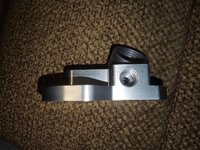
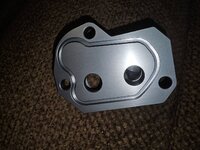
I will go directly to you next time because this has been a hellacious journey that I'm just glad is almost over.
I see I guess I was confused where the interference between the -12 fittings was. Or this is another adapter that solves the issue ? And you can run a tap through before or after hard anodize ? You can’t hard anodize a regular thread and expect it to still work. It builds up 4x on the threads and makes a big difference. But if the tap fits after the fact then it should be fine..None of the 1-1/16-12 fittings would fit the part, even after having a tap run through it. It completely perplexed three machine shops. We tried four different AN12 fittings and even verified their size by running them through other pieces tapped to that size. The part is hard anodized so perhaps that's what was causing the interference? None of us wanted to try and force a fitting down in the part and completely ruin it so I just settled on welding it. Here's the fitting:AN-12 to AN-12 Male Flare Union Fitting
P/N 15611: AN-12 to AN-12 Male Flare Union Fitting More area and smoother transitions from the inlet to the outlet, resulting in less restriction than any other fitting line.The Aeromotive line of custom fittings, adapters and hose-ends are a step above the norm, offering uncompromised fuel flow...aeromotiveinc.com
Here's the part:
View attachment 92201View attachment 92202View attachment 92200
I will go directly to you next time because this has been a hellacious journey that I'm just glad is almost over.
- Thread starter
- #240
Sorry man, meant to get back to you last night. The -12 fittings bind after about a turn AFTER running a tap through them after running a tap through them. Before, they'd catch almost immediately, maybe 1/3 of a turn. The adapter pictured is the same one with the issue. The fix has been to grind the threads down, seat the fittings, then weld them in place.I see I guess I was confused where the interference between the -12 fittings was. Or this is another adapter that solves the issue ? And you can run a tap through before or after hard anodize ? You can’t hard anodize a regular thread and expect it to still work. It builds up 4x on the threads and makes a big difference. But if the tap fits after the fact then it should be fine..
My request to Parts Badger was very specific. I told them it had to accept an AN12 fitting, which I verified in my design, in the request through their site, and again via e-mail. What you said about hard anodizing is something one of the shops brought up as well. They mentioned they had seen other issues similar to this where the part would normally fit but it wasn't designed with anodizing in mind. Considering anodizing is one of Parts Badger's options and they confirmed the fittings would fit, I didn't even consider this would be an issue.
I've certainly learned the hard way on this one. This is the first and last time I'll use an online CNC service for something like this.
Similar threads
- Replies
- 6
- Views
- 1K


