Thinking about getting an oil separator on the passenger side... Was wondering if anyone had any opinions about JLT versus Moroso...The Moroso looks more durable and I like the fact that is has all metal fittings. Looks like you might run into less problems with it breaking... Any thoughts? (I know the Moroso is a little more expensive, but I'd rather pay a little more if it's going to last longer. I heard though that I might need to replace those"heater hoses" as they're not really designed to withstand oil)
- Welcome to the Ford Mustang forum built for owners of the Mustang GT350, BOSS 302, GT500, and all other S550, S197, SN95, Fox Body and older Mustangs set up for open track days, road racing, and/or autocross. Join our forum, interact with others, share your build, and help us strengthen this community!
You are using an out of date browser. It may not display this or other websites correctly.
You should upgrade or use an alternative browser.
You should upgrade or use an alternative browser.
Different Oil Separator Installations
- Thread starter808Boss
- Start date
This site may earn a commission from merchant affiliate links, including eBay, Amazon, and others.
More options
Who Replied?NFSBOSS said:Great. Oh well easy come easy go.
I am surprised it came back so quick, teach ya to listen to me.
NFSBOSS said:I stopped by my local Ford dealer this morning and purchased these 5/16" x 3/4" push pins for installing the breather bracket. These don't break easily and should hold the breather just fine with the hoses in place. I purchased a second set in case one breaks or if I ever remove the breather I can use them to plug the holes. They cost $1 and are part # N807721-S. I hope to have it installed later this afternoon.
Those are a little longer then I used, mine were 1/2 inch at best. I remember there was plenty of room behind the firewall so you should be good, just double check after you install. You can sort of reach up in there from the passenger side floor. Mine has been on for over a year and they still hold like the day I installed it.
They should be fine and I'm glad yours are holding up well. Thanks for the tip.2012YellowBoss said:Those are a little longer then I used, mine were 1/2 inch at best. I remember there was plenty of room behind the firewall so you should be good, just double check after you install. You can sort of reach up in there from the passenger side floor. Mine has been on for over a year and they still hold like the day I installed it.
I didn't get mine installed today but will tomorrow. Here's what I'm using and it's very close to what Scott and James used:
1 - Peterson Fluid Systems 08-0400 Breather Can with AN -12 Ports http://www.amazon.com/Peterson-Fluid-Systems-08-0400-Breather/dp/B002GOPHRY/ref=pd_sim_sbs_auto_1
2 - Summit 220244B - AN -10 to AN -12 Adapter Black http://www.summitracing.com/parts/sum-220244b
2 - Earl's Hose Ends AT700110ERL http://www.summitracing.com/parts/ear-at700110erl/overview/
4 - Fragola E-Z Clamp Hose End, -10 AN - Black http://www.summitracing.com/parts/FRA-280210/Application/?prefilter=1
1 - Earl's 350610ERL - AN -10 PRO-LITE 350 HOSE 6 FOOT http://www.summitracing.com/parts/ear-350610erl/overview/
1 - Dorman 02253 - Bypass Cap Assortment http://www.oreillyauto.com/site/c/detail/DOR3/02253.oap?pt=N0262
OEM Parts:
1 - CR3Z-6A664-A - HOSE VENT http://www.fordpartsgiant.com/parts/ford-hose-vent_cr3z-6a664-a.html
1 - 4L2Z-6762-AA - ELBOW, CRANKCASE VENT
2 - N807721-S - Plastic Fasteners
ls110
John
Rick - Wow, thanks for that detailed list. I was able to buy all the parts from 3 sites; Amazon, TousleyFord, and SummitRacing in about 10 minutes. Gotta love the internet, and more importantly BMO!
Great. How are you going to attach the breather to the firewall?
ls110
John
My thought is to use the push pins and then go ahead and modify the firewall to allow for easy access to the can. I am not too worried about this irreversible change given the fact I have already hogged out the top of my strut towers to get more camber. This is minor in comparison.
LS110 said:and modify the firewall to allow for easy access to the can.
Don't bother, yes the 13 came that way but it is not needed. Mount the can spaced evenly between the battery and valve cover. Then using the bracket look for a good height spot to drill the firewall (the bracket should be about midway up on the can when done to look nice). If you have even a small space between the can and the lip on the firewall you will be able to pull it right out since the bracket comes completely undone for servicing.
You don't need to clean it that often, look back at my yearly check posted here. Even an obsessive person need only clean in every 2-3 track days.
ls110
John
2012YellowBoss said:Don't bother, yes the 13 came that way but it is not needed. Mount the can spaced evenly between the battery and valve cover.
Even better. Thanks for that input.
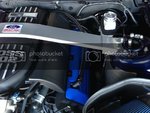
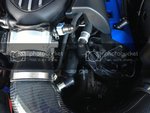
These projects always take longer than I expect but it came out clean looking. The plastic fasteners hold the bracket securely and I don't expect any issues with them. After drilling a pilot hole I used a 5/16 bit. That's a bit tight so the second hole I used a 21/64. I'd start with the 5/16 and if that looks too tight move to the 21/64. I also used Thomas and Betts Ty-Raps to attach the intake caps. They aren't going anywhere and provide a clean look. Here's the proof.



ls110
John
Nice install! That is one clean engine compartment. How far below the fire wall lip is the top of the can and are you able to open it without loosening the straps?
Thanks. I cleaned the engine before starting to work on it for the second time in almost 10,000 miles. My car doesn't get driven in the rain so the engine stays pretty clean. It's about 8-10 mm below. No way to open the lid without loosening the bracket.
ls110
John
Loosing the strap I would guess is simple, especially given this will not be all that frequent. Much better than cutting the wall lip.
- 110
- 0
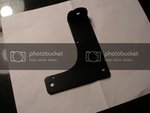
I finished up my install today. Pretty much just a copy of whats been done except I fabbed up an aluminum bracket for the mount. I mounted the breather to the firewall using the hole in the top lip so I did not have to drill any new holes. If anyone else wants to go this route its pretty simple and I can give you the dimensions. I also put some 1/4" self adhesive foam rubber on the back of the bracket to keep it from rubbing the firewall insulation. I could not get the 90 degree breather fitting into the hose with the Fragola clamp on so I had to file down the barbs on the fitting. The Earls prolite hose looks great but I found it difficult to work with especially with the an fittings. I'm happy with the result as it blends in with the rest of the factory fittings and hoses.
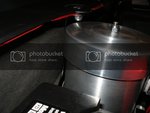
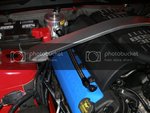
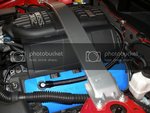


ls110
John
cp85gt said:Pretty much just a copy of whats been done except I fabbed up an aluminum bracket for the mount. I mounted the breather to the firewall using the hole in the top lip so I did not have to drill any new holes. If anyone else wants to go this route its pretty simple and I can give you the dimensions.
That would be great to get the dimensions for the the bracket. I have all the parts but have not installed yet. I minor item, but are you able to get the lid off can without loosing the strap?
cp, nice work on the bracket. I hose wasn't too tight on the AN fittings but was on the plastic Ford elbows.
- 110
- 0
With this setup, and I think with any setup in the same place, you will have to loosen the strap and drop the canister down to get the lid off as there just is not enough room. I cut my bracket out of some scrap 14ga aluminum with a hacksaw and used a drill and curved file to create the radius. For the top radius I used the hacksaw to remove most of the material and the file to shape it. It is easiest to just scribe an outline of the canister bracket onto the aluminum and then draw out the rest of the shape from there. I cleaned up the rough edges with a file and sandpaper. I used a 9/32 drill for the mounting holes. Centering the top hole in the bracket will give you about a 1-1/2" offset. I scribed a line 1" from the top to for the bend line. I used a vise to put the bend in, and then finished off with 2 coats of satin black spray paint. For mounting I used 1/2" 1/4-20 button head ss bolts and nylock nuts with washers.
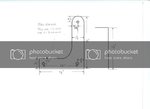

cp85gt said:With this setup, and I think with any setup in the same place, you will have to loosen the strap and drop the canister down to get the lid off as there just is not enough room.
First of all, that is very nice work. I think not having to drill holes into the firewall will be appealing to some people. However, if you are building a bracket anyway, why not have it tilted at an angle, so the filter assembly clears the firewall lip and can be removed without having to loosen the strap? Just change the angle of the dangle.
Man you guys are out of control with all these fancy race shop fabricated brackets, braided hoses Fragola (never ever heard that before) clamps and more. I sorta pieced this together on the internet guessing at hose sizes, Home Depot, the local dealer and AutoZone for a month. Then did a 20 minute install eye-balling the measurements and started drillin' away.
Yea I made mistakes, lots of mistakes and all of your setups look better, much better but, but ...... well .... crap, now I forgot what my point was for this post - something about acting like you own a limited edition special car - nevermind ;D
Yea I made mistakes, lots of mistakes and all of your setups look better, much better but, but ...... well .... crap, now I forgot what my point was for this post - something about acting like you own a limited edition special car - nevermind ;D
- 110
- 0
We'll Jimmy that would have been a good suggestion for me last week  . I guess you could bend the top of the bracket the other way and that would give you enough clearance provided there is enough room for the breather hose and fittings on the back side of the engine. It is kind of tight back there with that foam noise suppression stuff. Also, the sheet metal lip attachment point is fairly flexible so the canister might bounce around a little. I guess I could also reverse the bolt on top to give me more clearance.
Breaking news from latest Grand-Am race here in Austin, Texas. The leading Boss 302R race cars (both Roush and Jim Click's, at least), now use TWO Peterson oil breathers. I noticed both direct hose setups and crossed setups (breather can services opposite head).
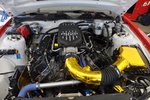
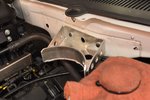
The right side breather cans were mounted in the typical way (directly to the firewall), but the new left side cans got their own mount, which clears the firewall lip and should allow for easier servicing.
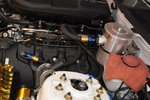
At appeared that all of the cans had petcocks for draining and I noticed that all of the factory breather tube connections are now safety-wired.
Sorry, fellow copycats, we have more work to do.

The right side breather cans were mounted in the typical way (directly to the firewall), but the new left side cans got their own mount, which clears the firewall lip and should allow for easier servicing.

At appeared that all of the cans had petcocks for draining and I noticed that all of the factory breather tube connections are now safety-wired.

Sorry, fellow copycats, we have more work to do.
