The Mustang Forum for Track & Racing Enthusiasts

Taking your Mustang to an open track/HPDE event for the first time? Do you race competitively? This forum is for you! Log in to remove most ads.

  • Welcome to the Ford Mustang forum built for owners of the Mustang GT350, BOSS 302, GT500, and all other S550, S197, SN95, Fox Body and older Mustangs set up for open track days, road racing, and/or autocross. Join our forum, interact with others, share your build, and help us strengthen this community!

S550 Honey Badger GT350 Build Build Thread Profile - S550 Mustangs

This site may earn a commission from merchant affiliate links, including eBay, Amazon, and others.

769
1,153
TX
It’s a good thing that not all kerbs are constructed the same. The ones that go “brrrrraaaappppp” are fine for me but the ones that set off air bags on cars like mine, not so much. At the drivers meeting at Road America, they warn you about the risks of “playing on the kerbs” especially about the new aggressive ones they put in at the “kink” !! @honeybadger , you’re in a different pay scale than me so I think you’ll be fine with your new build.
I have a bad habbit of playing on kerbs - specifically apex kerbs. That's where I'm most worried. But i'll probably test it out first and if it doesn't work - look for another solution. Doesn't look like there are many options that won't result in a power loss without going custom - which sucks.

Those new kerbs at the kink are brutal. they've gotten quite a few pros this year
 
50
42
Exp. Type
HPDE
Exp. Level
3-5 Years
California
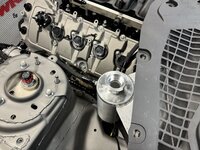
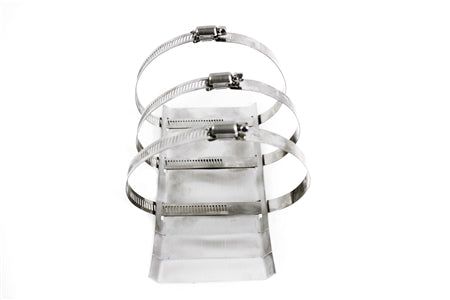
Sort of a hack, but can you make skid plates for the headers?
Some companies make some. This is what I used in my honda days because I loved my cars slammed and I loved riding curbing.
I would double check the size specs compared to your headers. Worst case scenario you could make your own with this as inspiration.
 
769
1,153
TX
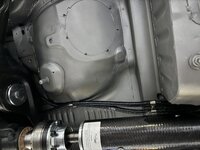
I mentioned earlier that I was going to replace the OEM rear lines after I couldn't get them to flare right when I needed to make a modification to them. Another component that led to me being pro-new lines was this section around the air jacks. Not sure if I just couldn't figure out how to get them re-installed or if they originally went through that spot, but either way, I couldn't get them to fit in a way I was comfortable with. Let's just say, I am being pretty neurotic about the brakes. I've seen brake failure at the track and it's terrifying. It's almost always a full car write off of the car and has led to a few scary injuries.

IMG_1779.jpeg

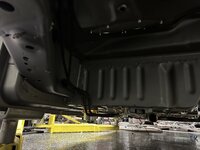
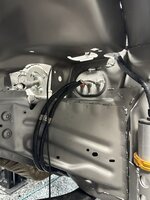
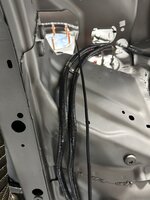
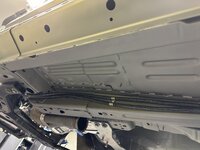
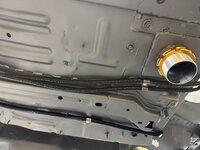
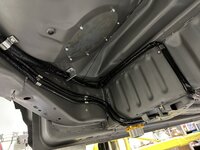
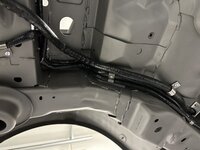
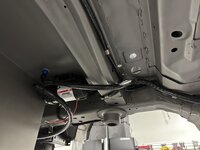
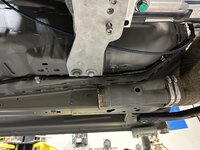
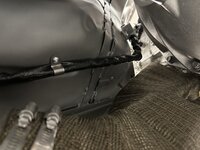
So - time for some new lines. the new lines utilize the same nickel copper material used inside the cabin. So I did my best to re-trace the bends of the OEM lines around the IRS/rear cradle and then did custom bends from the above picture forward. I then covered the entire lines in some 1/4in heat sleeving. This has two benefits. It's an absolutely fantastic way to protect against rubbing/abrasion and it's great at dealing with heat (i've had this stuff touch a header and survive a track day). I plan to run side exit exhaust where the OEM fuel tank went, so I wanted some additional heat protection (will also add a heat shield). But mostly, I used for the abrasion protection (see neurotic statement above).

So 3AN coming out of the bulkheads

IMG_1803.jpeg

Follows OEM line routing under the car. This also has a plastic shield to protect against tire debris

IMG_1802.jpeg

I utilized some holes from a previous hose route on the frame rails to secure the lines

IMG_1799.jpeg

Re-routed around the air jack

IMG_1798.jpeg

Really tight fitment around the OEM fuel tank area with zero chance of it falling down or rubbing

IMG_1797.jpeg

Then off to mimicking the OEM bends above the rear cradle. Clips in all the same places as OEM line. So great clearance and zero chance these get loose on me.

IMG_1796.jpeg

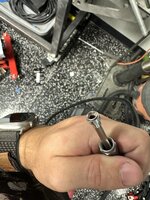
I'll have a video up later on how I am flaring these ends - but 3an 37degree flare with steel tube nuts and collar for the front bulkhead and then standard OEM double flare for the rear where the braided line connects to run to the calipers.

IMG_1794.jpeg

I also got the fuel hard line that runs under the car. This replaces the OEM line since my fuel filter is now by the fuel cell. run a AN line from the bulkhead in the trunk area (blue fitting in first pic below) to a bulkhead on the hardline. Then hard line under the car and into a bulkhead in the engine bay. Line is 3/8 - so 6AN. Same size as OEM - if power levels demand more. in the future, I can always change out. but unlikely to be a problem.

IMG_1795.jpeg

IMG_1800.jpeg

IMG_1801.jpeg


As far as proximity to the header - this gets protect with a factory heat shield that I still need to install.
 
769
1,153
TX
Sort of a hack, but can you make skid plates for the headers?

Some companies make some. This is what I used in my honda days because I loved my cars slammed and I loved riding curbing.
I would double check the size specs compared to your headers. Worst case scenario you could make your own with this as inspiration.


Current plan is to see how bad it is sitting on the ground at ride height. If worth risking, I'll put some skid plates on the frame rails and give it a try. But if I need go the custom route, I'll look into them.
 
445
590
Exp. Type
HPDE
Exp. Level
5-10 Years
Wisconsin
Just updated my reading the last couple posts & all I gotta says is, job well done Kevin !! All the work done in your space, outstanding !! The info from the others on TMO and your own research with developed skills is making this one exciting build !! Keep it going to the finish line !!
 
37
24
Exp. Type
HPDE
Exp. Level
Under 3 Years
Wyoming
Current plan is to see how bad it is sitting on the ground at ride height. If worth risking, I'll put some skid plates on the frame rails and give it a try. But if I need go the custom route, I'll look into them.
Cheers to all the Honey Badger progress and inspiration you are providing all of us following. I wish you were my next-door neighbor (but then I’d probably be a nuisance to you).

I’d like to discuss the lowering of the whole engine assembly. I think my configuration will be like the redone Honey Badger. My GT350 will also have the Dailey dry sump. I still plan on using the Steeda Road Race K-member but instead of Steeda engine mounts, I now want to use the Watson solid mounts (again your inspiration) as they are least compromising and seem to allow more room for headers. The Watson website says their Coyote mounts keep the stock engine height to comply with the racing rules many need to follow. I don’t have that constraint. Keven, you mentioned you thought your newest install would lower the engine about 1 inch. What K-member/engine cradle will you be using?

My interest in lowering the engine, beyond the center of gravity benefits, is accommodation for the individual throttle bodies, covered with a K&N filter box, sticking out of the hood as minimally as possible. Thoughts?
 
769
1,153
TX
Just updated my reading the last couple posts & all I gotta says is, job well done Kevin !! All the work done in your space, outstanding !! The info from the others on TMO and your own research with developed skills is making this one exciting build !! Keep it going to the finish line !!
Appreciate the kind words! Thanks!

Cheers to all the Honey Badger progress and inspiration you are providing all of us following. I wish you were my next-door neighbor (but then I’d probably be a nuisance to you).

I’d like to discuss the lowering of the whole engine assembly. I think my configuration will be like the redone Honey Badger. My GT350 will also have the Dailey dry sump. I still plan on using the Steeda Road Race K-member but instead of Steeda engine mounts, I now want to use the Watson solid mounts (again your inspiration) as they are least compromising and seem to allow more room for headers. The Watson website says their Coyote mounts keep the stock engine height to comply with the racing rules many need to follow. I don’t have that constraint. Keven, you mentioned you thought your newest install would lower the engine about 1 inch. What K-member/engine cradle will you be using?

My interest in lowering the engine, beyond the center of gravity benefits, is accommodation for the individual throttle bodies, covered with a K&N filter box, sticking out of the hood as minimally as possible. Thoughts?
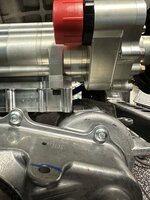
I went with the CJ/lowering mounts. They lowered it about an inch - it's a lot more than you think. Really gave a ton of room around the firewall. One thing to keep in mind - the clearance around the dry sump pan up front is pretty tight. I don't think I'll have an issue with everything solid mounted, but we'll see.

IMG_1659.JPG

I have stock k-member for now. Couldn't convince myself to spend big money on one just to cut up if I didn't know it would work. I might switch later...but chose to stick it out with the OEM one for now. I have to be reasonable in at least a few areas.
 
37
24
Exp. Type
HPDE
Exp. Level
Under 3 Years
Wyoming
Appreciate the kind words! Thanks!


I went with the CJ/lowering mounts. They lowered it about an inch - it's a lot more than you think. Really gave a ton of room around the firewall. One thing to keep in mind - the clearance around the dry sump pan up front is pretty tight. I don't think I'll have an issue with everything solid mounted, but we'll see.

View attachment 90108

I have stock k-member for now. Couldn't convince myself to spend big money on one just to cut up if I didn't know it would work. I might switch later...but chose to stick it out with the OEM one for now. I have to be reasonable in at least a few areas.
"Reasonable in at least a few areas." Understood, I think. This is from a guy virtually building a race car by hand using what's good from Ford, best suppliers, and hand crafting everything else? What exactly are the "CJ/lowering mounts"? I was ready today to order the Watson solid engine mounts -- didn't happen because I didn't hear back from a key player.

So what do you mean by "an inch is a lot more than you think"? My mind is going about driveshaft angles because I lowered the suspension about an inch already with Steeda springs. How do you see the drivetrain angles from crankshaft output to rear differential? Also, you mention "everything solid mounted." Does this meant there are no rubber/plastic bushings for any of Honey Badger's drive train components? This also weighs on my mind. If I have solid mounts up front but not for the transmission on back am I not completing the job?

I'm probably a little paranoid because I'm about to drop a lot of money on parts. I'm not an overconfident mechanic because I don't have your skills but I do consider everything I can. I'm not a kid drag racer, I build for reliability and responsiveness over the long road.
 
769
1,153
TX
"Reasonable in at least a few areas." Understood, I think. This is from a guy virtually building a race car by hand using what's good from Ford, best suppliers, and hand crafting everything else? What exactly are the "CJ/lowering mounts"? I was ready today to order the Watson solid engine mounts -- didn't happen because I didn't hear back from a key player.

So what do you mean by "an inch is a lot more than you think"? My mind is going about driveshaft angles because I lowered the suspension about an inch already with Steeda springs. How do you see the drivetrain angles from crankshaft output to rear differential? Also, you mention "everything solid mounted." Does this meant there are no rubber/plastic bushings for any of Honey Badger's drive train components? This also weighs on my mind. If I have solid mounts up front but not for the transmission on back am I not completing the job?

I'm probably a little paranoid because I'm about to drop a lot of money on parts. I'm not an overconfident mechanic because I don't have your skills but I do consider everything I can. I'm not a kid drag racer, I build for reliability and responsiveness over the long road.
Ha. The alternative was the Cortex SLA - so I consider it a pretty big compromise :D

The CJ/lowering mounts are the Watson mounts with a 1in drop.

My driveshaft angle appears to be about 1 degree difference, but I need the actual driveshaft I plan to use to dial it in fully. That just shipped, so hopefully I will be able to correct any issues with height adjustments on the transmission mount. There's enough play you can lower or raise that way.

There are no rubber bits any where in the drivetrain anymore. All solid mounts/bushings now. Will have a ton of NVH, but that's fine with me :)

I wouldn't run solid mounts on an FPC motor, though. You'll 100% rattle it apart and have some pretty crazy harmonics around the 3300 rpm range (if memory serves me correctly).
 
37
24
Exp. Type
HPDE
Exp. Level
Under 3 Years
Wyoming
Ha. The alternative was the Cortex SLA - so I consider it a pretty big compromise :D

The CJ/lowering mounts are the Watson mounts with a 1in drop.

My driveshaft angle appears to be about 1 degree difference, but I need the actual driveshaft I plan to use to dial it in fully. That just shipped, so hopefully I will be able to correct any issues with height adjustments on the transmission mount. There's enough play you can lower or raise that way.

There are no rubber bits any where in the drivetrain anymore. All solid mounts/bushings now. Will have a ton of NVH, but that's fine with me :)

I wouldn't run solid mounts on an FPC motor, though. You'll 100% rattle it apart and have some pretty crazy harmonics around the 3300 rpm range (if memory serves me correctly)
I like the idea of all solid: give me the information from the road. You want comforts of your living room or do you want to drive? And yes, always on my mind, best suspension, SLA, cantilever rear set, inspiration from Paul's Automotive Engineering, the new GT3, GT4, or GTD. We can't rethink the whole project mid-life unless we're made of money. I'm taxed to the max now!

So my re-build is cross plane. Yeah -- there is no short stroke to be had to make the FPC work reliably in the Coyote, maintaining power and torque. Different game. So we live with a great engine (look at the basically unbeatable BMEP physics), just not the initial excitement of the FPC. The Coyote architecture is just not amenable to it's longer stroke for FPC. I've gone much more than I thought reliable with the stroke, 99mm or 3.9in. So 94mm bore and 99mm stroke equals 5.5 liters. But mine is mostly a street car. I am building for maximum reliability and responsiveness, country road or track. With the individual throttle bodies especially, but with all the other custom goodies too, MoTeC will keep control.

Big picture, Honey Badger is an inspiration. Overall architecture is thoughtful. I need my mechanics next to figure the dry sump layout with minimum fuss. I need to get the piece of mind, like you've done with the box for the oil tank in HB, for my car. I can't even keep up with your cooling system or air jack track goodies let alone epic hours of chassis prep. That's way next step for me. Whew.
 
769
1,153
TX
769
1,153
TX
made some good progress this weekend.

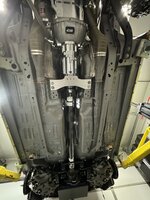
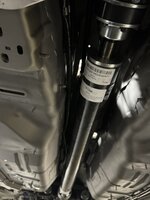
Got the new custom driveshaft shop shaft in this weekend. Given the sequential, I really couldnt use aluminum and I really didn't want a steel shaft - both for weight and safety. After seeing a few exploding metal shafts - I've made the upgrade to CF a safety issue for me personally. Having a shaft whacking the transmission tunnel and threatening your legs is no fun from what i've seen. and I have no desire to experience. Fortunately, when a CF unit fails, it pretty much just explodes into lots of fibers.

So safer and much lighter.

IMG_1966.jpeg

I measured the various angles - looks like we're at 0.4 degree at both joints, so well within the 1 degree tolerance. Shouldn't have any vibrations - but we'll see.

I also finished up the cooler lines. I went back and forth on the routing what felt like a billion times. Ended up going inside the trans tunnel due to protection from kerb hopping/off roading/exhaust system. And since I went with a CF driveshaft, a failure that leads to debris piercing the lines, but the car still driveable is very unlikely. My thinking is that if I'm worried about the lines, there's a bigger issue to keep me off the track any ways. We'll see how it plays out.

IMG_1975.jpeg

Not my first choice, but the best choice I had given packaging constraints I think.

IMG_1976.jpegIMG_1974.jpeg

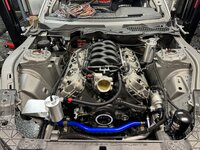
I also got a chance to finish up the plumbing tonight (well, 98% there). Water and oil plumbing is now finished. Just waiting on a couple hose ends and then I'll take everything off and send to BMRS for crimping. I am working on a plumbing video now for those interested in the ins and outs.

I also got my custom header and swirl tanks for Rob at TracTuff. Dude does awesome work and was very happy with the results.
IMG_1967.jpeg

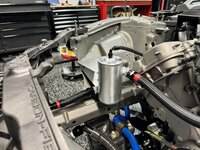
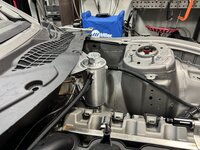
Swirl tank to remove air from the system. Vent on top goes back to the header tank.IMG_1968.jpeg

Header tank is at the highest part of the system for bleeding as well as filling. The (3) 6an lines are breathers from various parts of the system - head, swirl pot, and radiator.
IMG_1970.jpeg

Not installed yet is the overflow line and cap. Header tank uses standard domestic radiator cap. A keen eye will notice a 10an hose down near the header. This will connector to the lower radiator hose right below the water pump to act as a fill for the system.

IMG_1969.jpeg

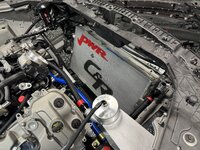
So much room for activities with the tilted radiator. After wiring, I'll let get started on the ducting.
IMG_1971.jpeg
 

TMO Supporting Vendors

Top